


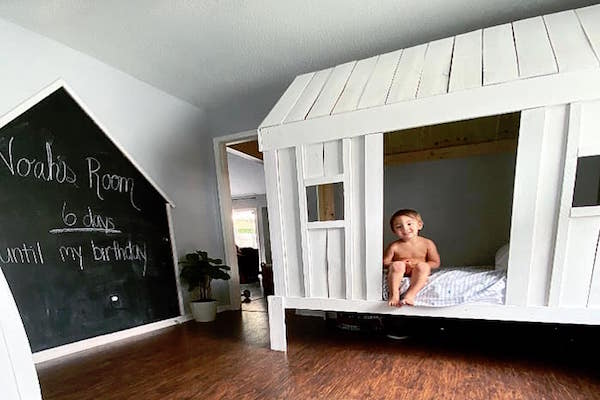
Who doesn’t love to save a dollar (or $800) on a super cute house bed? I know that I can’t be the only mom who finds pictures of decorative items that are way overpriced and has this Pinterest dream that she can create something very similar with hardly any budget. Let me preface this by saying, the only reason this bed came to life is because I had a live-in handyman I sweet-talked into making my Pinterest dream a reality. (I have to give my husband a little bit of credit here since he was the one who put the whole bed together!) He knows that a late night spent browsing the internet often results in some kind of budget-friendly project idea that I am pitching to him, and this time it just so happened to be an adorable DIY wooden house bed for my kiddo!


If you have seen these beds online, they are charming, trendy, and seriously overpriced. I mean, what toddler needs a $1,000 house bed? When I was growing up, the phrase my mom would often use is, “Kelsey, you have a champagne taste on a beer budget.” Not much has changed in my adult life. I like things that look nice, HOWEVER, I love to save money and get a thrill out of making something cheap look expensive! Growing up in a family with seven kids and shelling out way too much on my husband’s law school loan payments in my adult life really helped me exercise my creativity in the saving-money department. So, let’s attempt to build this house bed, shall we?
Disclaimer: My husband literally looked at a picture I showed him and built it from there. There were no step-by-step instructions, therefore, the below instructions should not be taken as gospel. Find a picture of something you like, and do your best! This is how we did it — all for under $150!
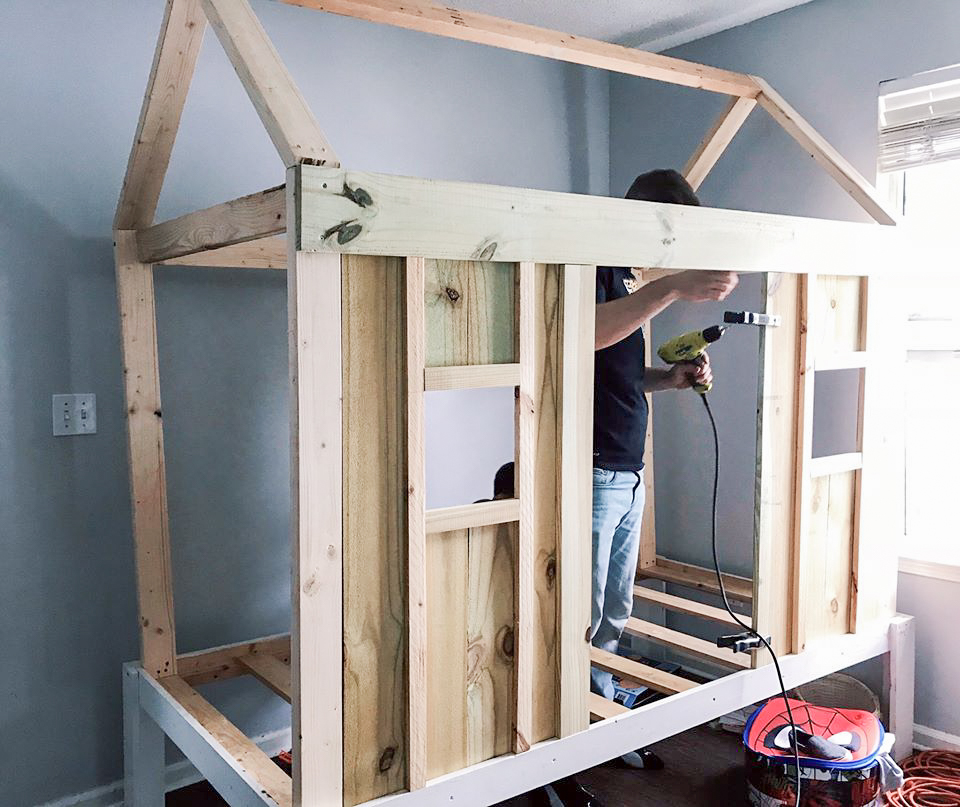
Step One: If you already have a wooden bed frame, you can start by affixing the frame of the house to the bed frame. Here, you can see we used 2×4 boards to frame the exterior of the house and the roof. We bought 2x4x8 boards, which typically cost around $4 each, and cut them to the appropriate height for the room. The saw we used was a double bevel miter saw, so it was a little bit easier to make those angled cuts for the roof pitch. Also, we doubled up on all screws to ensure the frame was sturdy and safely secured to the bed frame. When you’re done with the frame — which is essentially the four vertical corner posts, the rafters of the roof, and the supporting cross beams — you will be able to start adding your siding and windows.
Step Two: The next thing we did was build the framing for the windows, which we used 1×2 furring strips to make. We bought 1x2x8 furring strips, which typically cost $1.50 per board, and cut them to the fit perfectly between the bed frame and the top crossbeam. You can cut the horizontal piece of the frame of the window to your desired width.
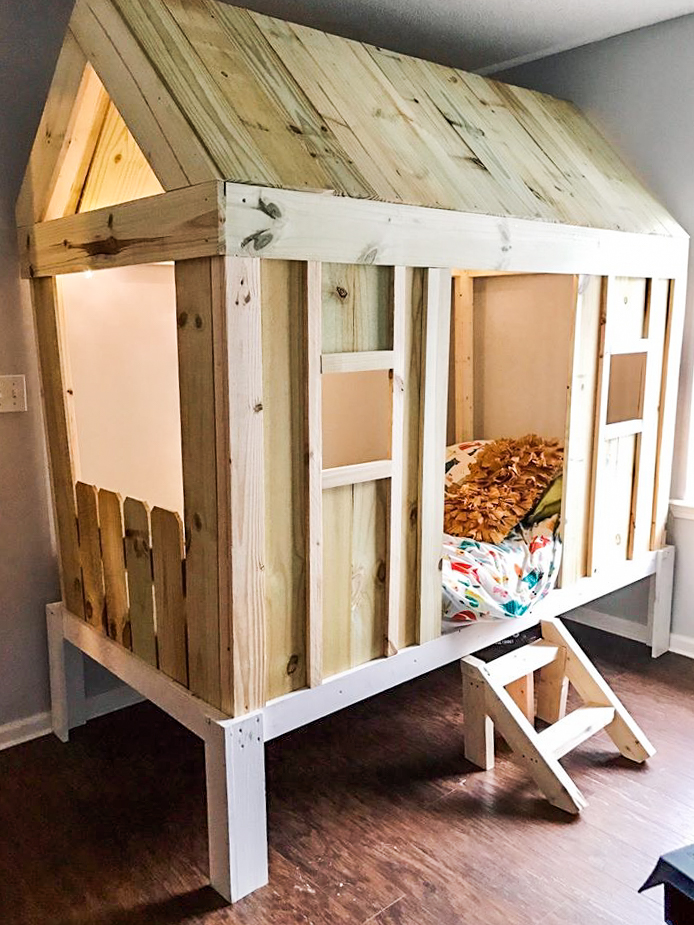
Step Three: Once the window frames are built, you can start placing the siding on the frame, which we used 5/8 in x 5 1/2 in x 6 ft fence pickets that cost around $1.75 per picket. Using these fence pickets were one of the main reasons we were able to make the house bed for such an affordable price. Place the pickets around the exterior, cutting them to the appropriate height and leaving space to place the window frames and entrance into the bed. If the bed is going against a wall, it is not necessary to add pickets to the side going against the wall. Once you’ve finished the sides, you can then add the pickets to the roof frame.
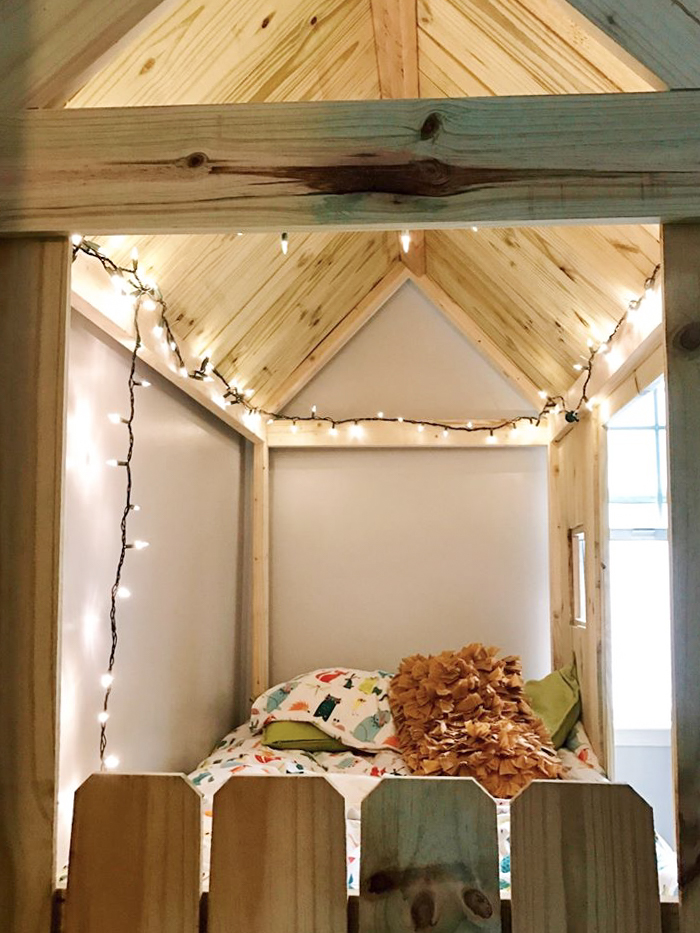
These instructions are by no means an exhaustive description of what your house bed has to be! You can add your own flare, adjust the frame and picket spacing, or, if needed, use different materials to make your little one’s house bed their own. Most importantly, this is an opportunity for your family to work together to construct something special, something they most certainly won’t ever forget!


This DIY house bed idea is fantastic! I love how creative and budget-friendly it is. Can’t wait to try this for my kids’ room! Thanks for sharing such clear instructions!
This DIY house bed project looks amazing! I love how creative and budget-friendly it is. Can’t wait to try this out for my kids’ room! Thanks for sharing such detailed instructions!
This DIY house bed is absolutely adorable! I love the idea of personalizing my child’s space while saving money. The detailed instructions make it seem manageable, and I can’t wait to try it out. Great post!